Français (France)
  Español (España)
  Deutsch (Deutschland)
  English (United Kingdom)
 Working with Design Options
Overview
Get explanations of all options and settings in the Designer Options of TipTicker
Edit Message lines
Overview
In Designer Options you can edit the settings of the tip message lines. This is done by adjusting the settings on the following screen. You find it in TipTicker if you follow this menu path:
Options ==> Design Options ==> select tab "Settings of Message Lines"
The areas of interest are marked with a referencing number in a red dot. All following numberings refer to these dots. Where needed a special chaper describes the setting in detail.
This definition is essential for TipTicker to work. Because of this, TipTicker don't let you connect to your alias if you have not at least made some settings and adjustments here and in Edit Tip Timings.
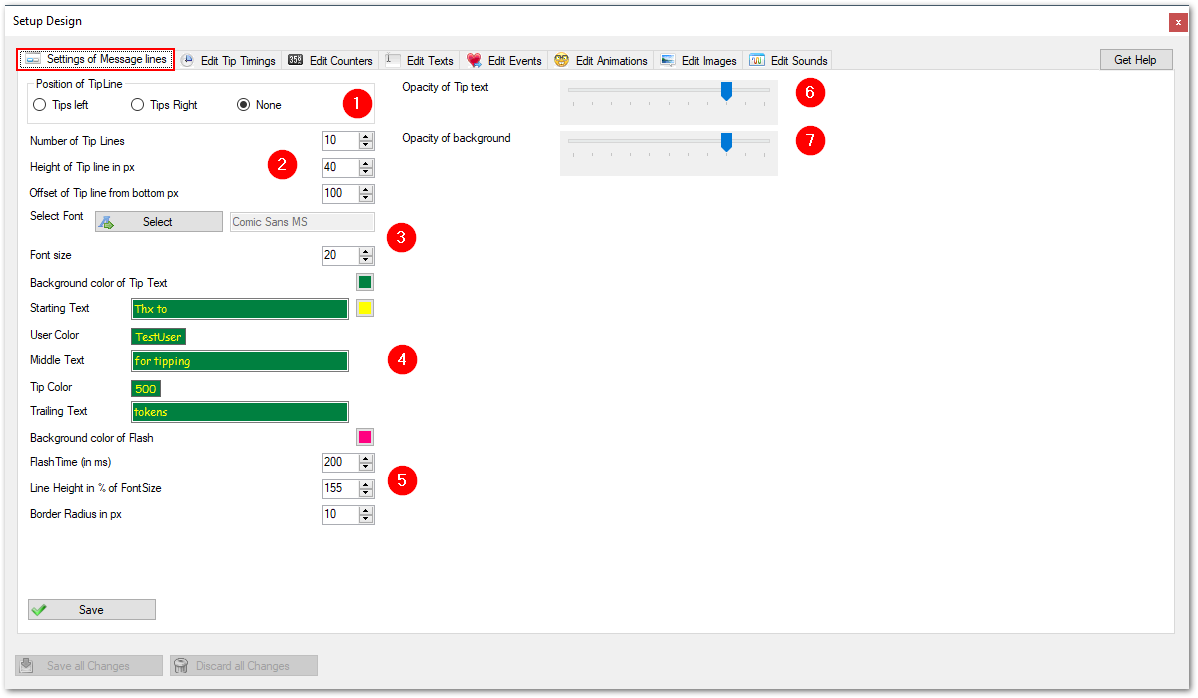
(1) Position of the Tip line:
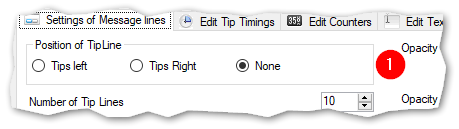
This setting controls the location of the tip messages. All message lines are located on the bottom of the screen. You can decide if you want them at the left or right side, or no tip messages at all (option none).
(2) Additional attributes of the Tip line:
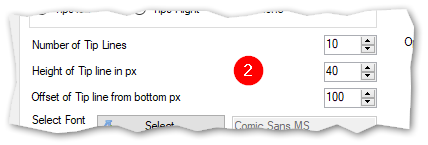
- Number of Tip Lines: defines how many tip messages are stacked on display. They get removed one after the other when the defined timeout has reached
- Height of Tip Line: Adjusts the height of the tip messages. You need to set it according to your font size.
- Offset from bottom: sets the distance of the first message from the bottom of the screen. Set it to your needs.
(3) Set Font attributes:
You can use any font which is installed on your broadcasting system. It is even possible to download and install new fonts on your system.
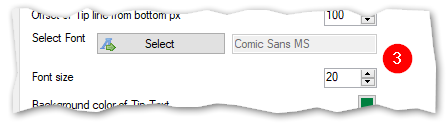
- Select Font: Select the font of your liking. This font will be used to show the messages for incoming tips.
- Font Size: Set the size in pixels of the selected font.
(4) Define the different parts of the tip messages and set the colors.
A tip message consist of 5 parts. 3 of them can be defined individually. All parts will show up together in one message line. You can set the forecolor and the back color of the messages.
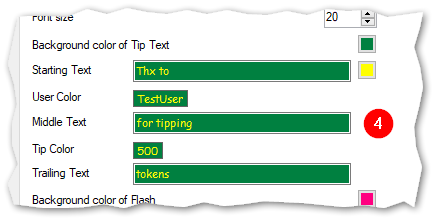
- Background color of the tip text: This defines the color of the message line. Click on it to select a new color.
- Button below (here yellow): defines the color of the message text. Click on it to select a new color.
- Starting Text: Here you define the starting text individually. It preceedes the name of the tipping user.
- Middle Text: Define a text which is placed between the name of the tipping user and the tip amount.
- Trailing Text: Define a text which is following the tip amount.
(5) Define Flash attributes and other attributes:
If you want, every incoming tip flashes once for a short time at the beginning of the appearance. You can also define the gap between two message lines. Finally it is possible to define, that a message line has rounded corners.
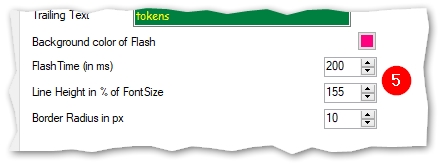
- Backround color of Flash: Define a contrasting color to enable flashing of the beckground of the message line.
- Flash Time: Set the flash time in milliseconds. The higher the value the longer the message is show in the flash color. Be sure to set this value lower than the shortest TipTiming (see next chapter).
- Line Height in % of FontSize: experiment with this to find the correct value. It defines the space betwenn the bottom of the first message line and the bottom of the following one.
- Border Ragius in px: Here you define the rounding of the corners of the message line.
(6) Define the Opacity of the text:
It is possible to set how much of the video stream is covered by the tip message. With this trackbar you can set this attribute. The more left the more transparent the text will be, the more right the more opaque it becomes.
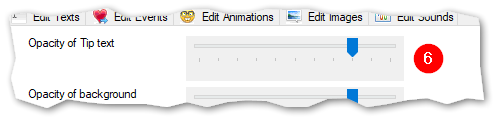
- Opacity of Tip text: Drag the slider to the right and your text will become more opaque. Drag it to the left and it gets more transparent. Set this to your needs.
(7) Define the Opacity of the background:
Same as with the message text can be done with the background of the message line. Adjust it with this trackbar.
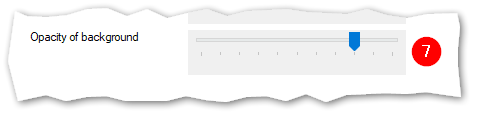
- Opacity of background: Drag the slider to the right and the background will become more opaque. Drag it to the left and it gets more transparent. Set this to your needs.
Dont forget to save your settings!
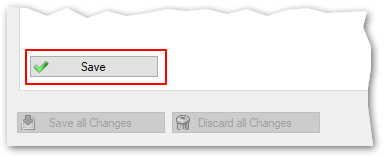
To save the settings you made, click on the Save button. These settings get activated and take effect after you have closed the Design Options screen.
Edit Tip Levels
Overview
In Designer Options you can edit the settings of the timings. This is done by adjusting the settings on the following screen. You find it in TipTicker if you follow this menu path:
Options ==> Design Options ==> select tab "Settings of Tip Timings"
The areas of interest are marked with a referencing number in a red dot. All following numberings refer to these dots. Where needed a special chaper describes the setting in detail.
This definition is essential for TipTicker to work. Because of this, TipTicker don't let you connect to your alias if you have not at least made some settings and adjustments here and in Edit Message Lines.
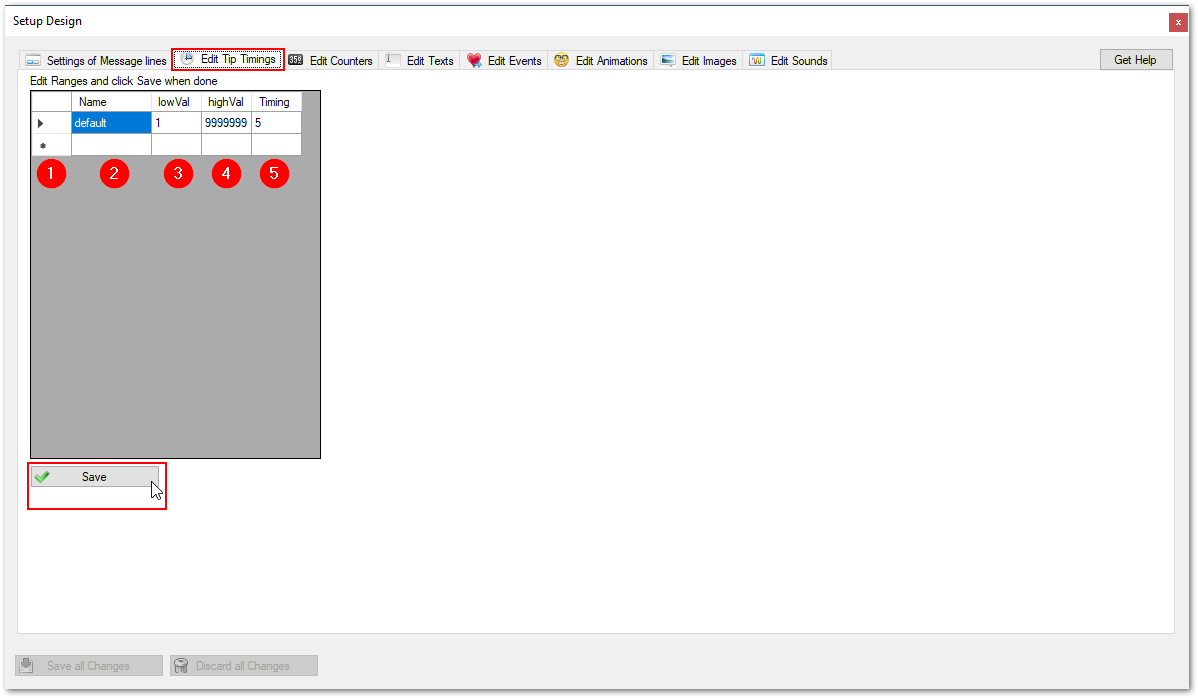
(1) Record selector:
If you click on the small triangle you can select a row for operations, like delete or edit.
The selected row becomes the active one. If you want to edit the value of a specific cell, double click in that cell and you are able to change the values. The changes will get stored as you leave the cell.
To delete a row, just mark it as described above and press the Del(ete) button.
(2) Name:
Specify the desired name for a particular timing. You can name it as you like, but make sure it is a unique name.
(3) lowVal:
Specifies the lower value of the amount of a tip. If someone tips you this amount or more (up to highVal), then this Timing gets activated.
(4) highVal:
Specifies the upper value of the amount of a tip. If someone tips you up to this amount (and higher than lowVal, then this timing gets activated.
(5) Timing:
Specifies the show time of a message in seconds. The higher the value the longer the tip message stays visible.
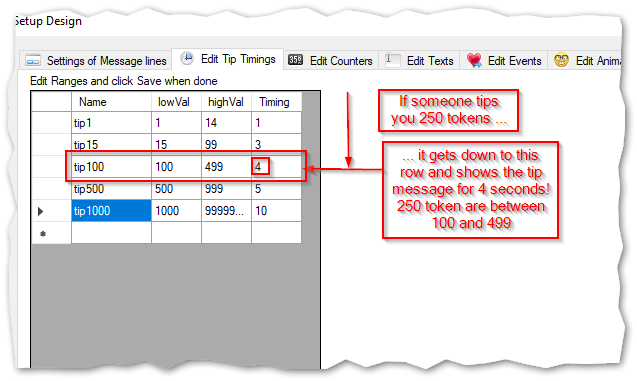
Here one example of how it works:
Edit Counters
Overview
In Designer Options you can edit the settings of the Counters. This is done by adjusting the settings on the following screen. You find it in TipTicker if you follow this menu path:
Options ==> Design Options ==> select tab "Edit Counters"
The areas of interest are marked with a referencing number in a red dot. All following numberings refer to these dots. Where needed a special chapter describes the setting in detail.
With counters you are able to use accumulated values of tips in your images. Counters can be shown together with images using texts (see there). They can trigger events. E.g. if you have specified a goal you can show a special image defined for this goal.
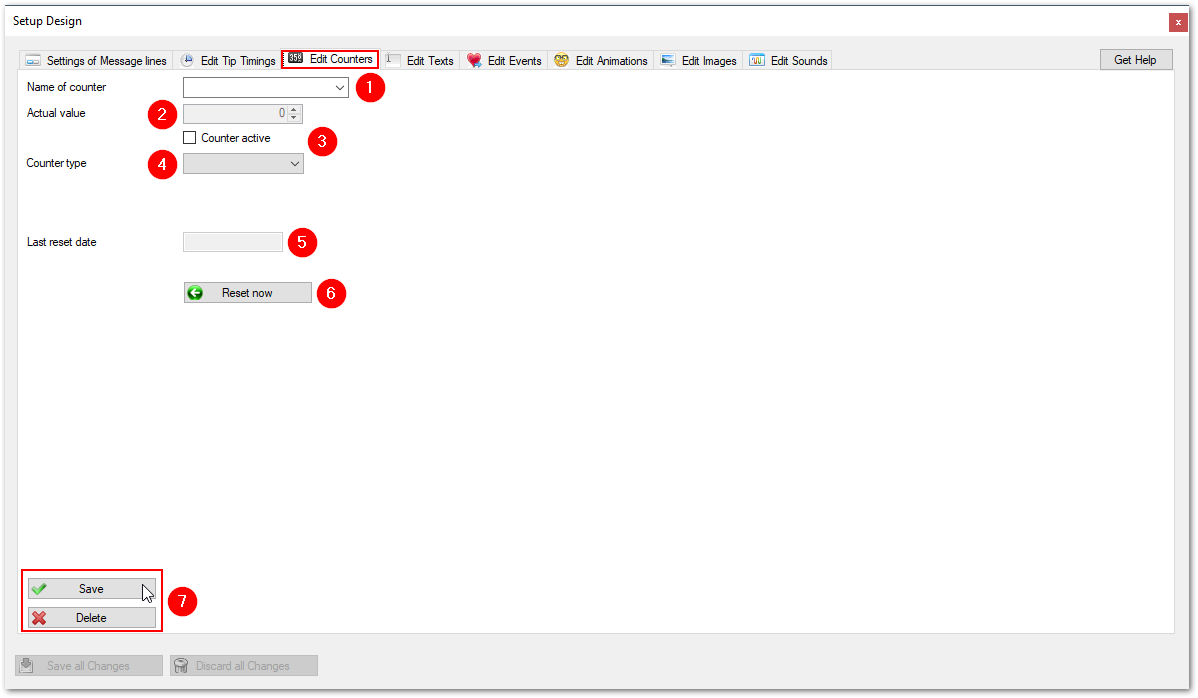
(1) Specify or select the name of counter:
If you specify a new name, the definition gets stored with a new name. If you select an existing name, all changes get stored under the existing name.
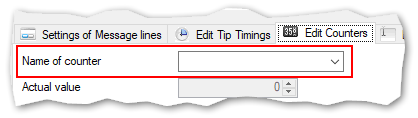
(2) Actual value:
Only an information. You can inspect the actual value of the counter specified. No change possible. It does not represent the value during runtime of TipTicker. If you end TipTicker the cumulated value of this counter gets stored. Only applicable for counters of type Day, Month, Year, Overall and Goal.
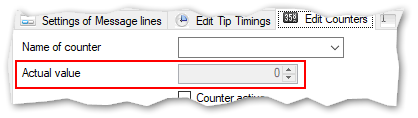
(3) Counter active:
With this option you can set a counter active or inactive. The specified counter get used and populated if the checkbox is checked.
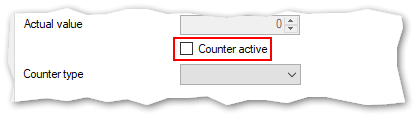
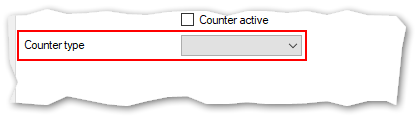
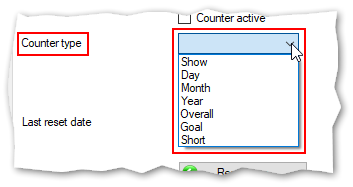
(4) Counter type:
Select from different counter types. The types Short and Goal will activate and need additional information (see below).
List of counter types:
- Show
- Is valid only during the actual running TipTicker session.
- If you restart TipTicker the counter gets reset.
- Day
- Is valid for the actual day.
- It gets reset at midnight.
- It continues to count even you restart TipTicker.
- It does not respect Tips you get during inactivity of TipTicker!
- Month
- Is valid for the actual month.
- It gets reset at midnight at the end of the actual month.
- It continues to count even you restart TipTicker.
- It does not respect Tips you get during inactivity of TipTicker!
- Year
- Is valid for the actual year.
- It gets reset at midnight at the end of the actual year.
- It continues to count even you restart TipTicker.
- It does not respect Tips you get during inactivity of TipTicker!
- Overall
- Is always valid.
- Only manual reset using the "Reset Now" button (see below).
- It continues to count even you restart TipTicker.
- It does not respect Tips you get during inactivity of TipTicker!
- Goal
- Is always valid.
- Will be reset on reaching goal or with manual reset using the Reset Now button.
- Has a second counter which counts how often the counter has hit the goal (Goal Hit count, see below).
- It does not respect Tips you get during inactivity of TipTicker!
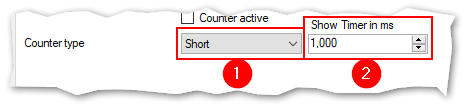
- Short
- Is only valid during the time span specified in the accompanying field "Show Timer in ms".
- Will be reset after reaching timer end.
- Can be used to show tip flow during a "Yellow Wall" period.
- Can be used to count tokens for other periods than those specified above.
Details see below.
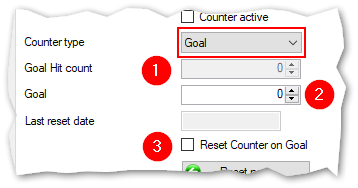
Details for counter typ "Goal"
- (1) Goal Hit count
- Number of goal hits.
- Is a special counter which is only available for counter type "Goal"
- (2) Goal
- Specifiy the goal which must be reached to trigger an event.
- You can enter any valid positive number. No decimals allowed.
- (3) Reset Counter on Goal
- Check this attribute to automatically restart counting.
- Hitting the limit specified in (2) will increment the Goal Hit counter
Details for counter type "Short"
- If you specify a counter of type Short you need to to enter a timespan (2).
- This timespan specifies how long to count incoming tokens, in milliseconds.
- If you click on the arrows in this field the value gets up or down in steps of 1000 (which is equal to 1 second).
- You can enter any positive number.
- Avoid using very low values because counter values will be incorrect.
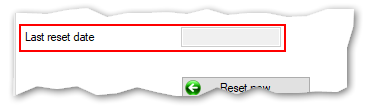
Last reset date
Only information. Shows you the date when reset of the counter value happened the last time.
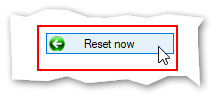
Button "Reset now"
- Click this button if you need to reset a counter value to zero (0).
- The actual value of the counter will be reset immediately.
- Click Save and Save all changes.
- If you leave Design Options the counter gets reset in TipTicker.
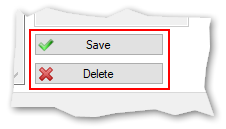
Save and Delete
- Button "Save" saves the actual counter definition.
- Button "Delete" deletes the actual counter definition.

Edit Texts
Overview
In Designer Options you can edit the settings of the texts. This is done by adjusting the settings on the following screen. You find it in TipTicker if you follow this menu path:
Options ==> Design Options ==> select tab "Edit Texts"
The areas of interest are marked with a referencing number in a red dot. All following numberings refer to these dots. Where needed a special chaper describes the setting in detail.
Texts can be added to images. Within these texts you can use several replacement variables or macros. These variables become very handy if you want to display e.g. a tippers name. It is also possible to show a counter value or how often a goal has been reached. With text is is easy to celebrate special events in detail.
These texts are able to put together constant text with many aspects of the incoming tips. E.g. it is possible to include the user name of a tipping guest.

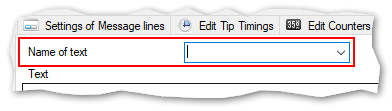
(1) Name of text:
- Specify or select the unique name of the text
- This name gets referenced by assigning it to images
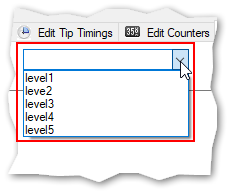
Example of a populated list of texts
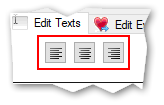
(2) Alignment of text in textbox
Text can be
- left aligned (default)
- centered
- right aligned
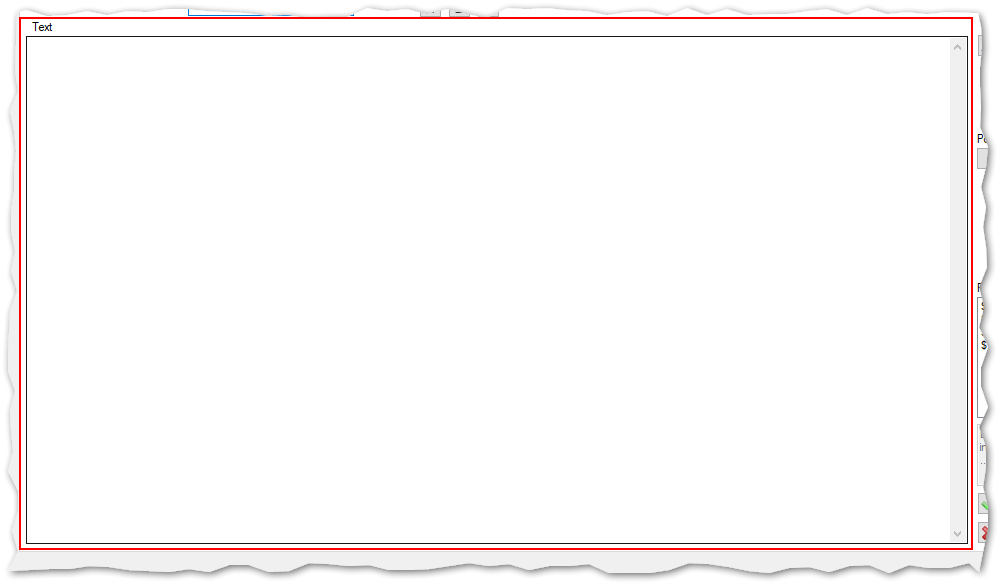
(3) Text Editor
- Enter the text constant.
- Set alignment.
- Set font and font size.
- Set colors (text and background).
- Insert replacement variables.
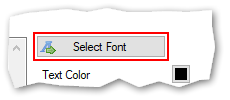
(4) Select Font
- Font
- Style
- Size
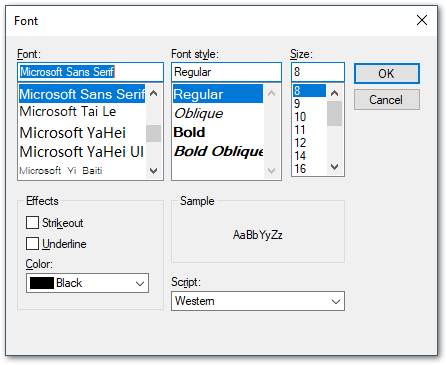
Font Dialog:
Set the following aspects of the text:
- Font (you can use any font installed on your system)
- Style, use one of the styles available for the selected font
- Define the size in points; the higher the value the bigger the text
- Click OK to complete selection
(5) specify the coloring of the text:
- Set the text color
- Set the background color ( Attention: The background color White gets rendered as Transparent!)

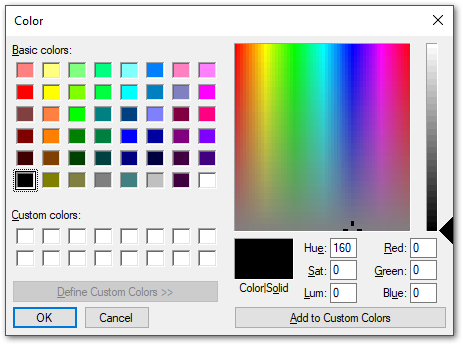
Color dialog:
Select or define a color used for text or background.
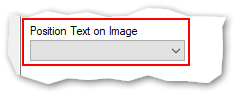
(6) Position Text on Image:
Specify the placement related to the image the text is assigned to. Texts get displayed together with the images to which they are assigned. This attribute specifies the location. If animations are in effect then they will also apply to the texts.
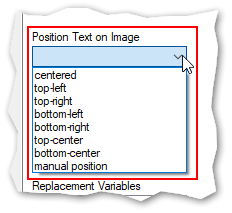
List of possible positions of texts
- centered: Place the text in the center of the image
- top-left: Place the text in the top left corner of the image
- top-right: Place the text in the top right corner of the image
- bottom-left: Place the text in the bottom left corner of the image.
- bottom-right: Place the text in the bottom right corner of the image
- top-center: Place the text centered on the top edge of the image
- bottom center: Place the text centered on the bottom edge of the image
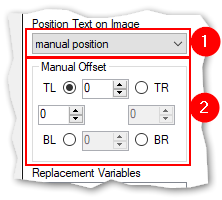
- manual position: Set the position of the text manually (see below)
manual position:
With this positioning option it is possible to specify the position of the text exactly as needed.
- Specify the origin of the displacement
- TL --> top left corner
- TR --> top right corner
- BL --> bottom left corner
- BR --> bottom right corner
- Specify the horizontal offset in pixels
- Enter or select a postive number between 0 and 9999
- Only related offsets are enabled
- Specify the vertical offset in pixels
- Enter or select a postive number between 0 and 9999
- Only related offsets are enabled
(7) Replacement Variables:
The following replacement variables are available:
- $USER$ --> will be replaced by the user name of the tipping guest
- $TIPAMOUNT$ --> will be replaced by the amount of tokens of a tip
- $USERROLE$ --> will be replace by the following possible roles and status of a user:
- Fan --> member of Fanclub
- Moderator --> elevated to moderator status
- CB-Addicted --> tipped more than 1000 tokens recently
- Guest -- all other users (except grays)
- $TIPMESSAGE$ --> Displays the the message sent with a tip (rarely used)
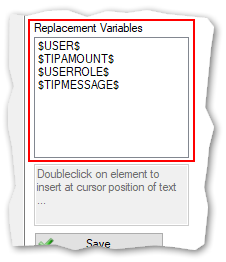
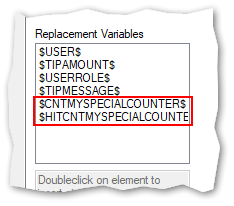
Defined counters are added to the list of replacement variables.
Here an example:
The definition of MySpecialCounter:
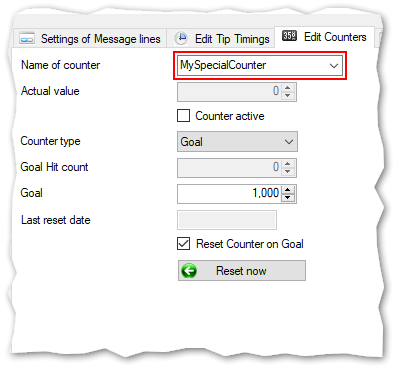
The defined counter for a goal adds two replacement variables to the list:
- $CNTMYSPECIALCOUNTER$ --> inserts the actual value of the counter MySpecialCounter
- $HITCNTMYSPECIALCOUNTER$ --> inserts the value of how many times the counter MySpecialCounter has hit the defined goal (in the example 1000 tokens)
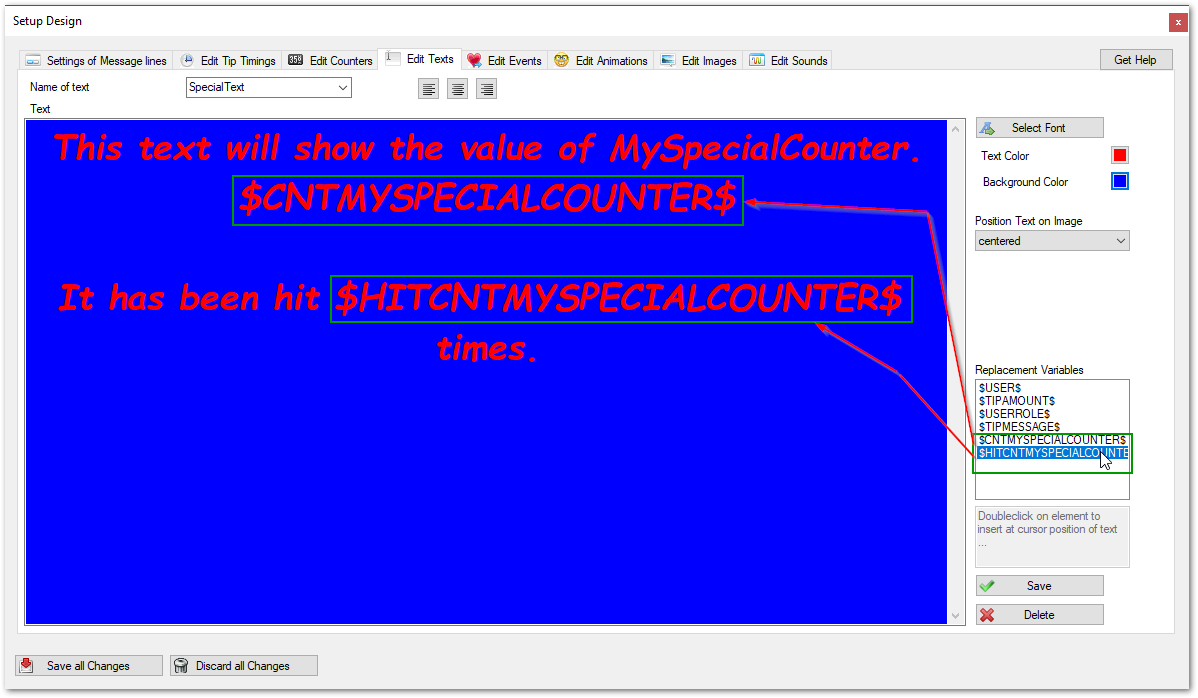
Example of how to use the replacement variables:
To save your changes click on the "Save" button.
To delete a text click on the "Delete" button.
The deletion of a text in use (e.g. used in an image assignment) is not possible. You will get an error message. To successfully delete a text it is necessary to remove any assignment.
Edit Events
Overview
In Designer Options you can edit the settings of the events. This is done by adjusting the settings on the following screen. You find it in TipTicker if you follow this menu path:
Options ==> Design Options ==> select tab "Edit Events"
The areas of interest are marked with a referencing number in a red dot. All following numberings refer to these dots. Where needed a special chaper describes the setting in detail.
This is the most complex area of a TipTicker design. It is essential to understand this to get a TipTicker design with full functionality.
The concept of events enables TipTicker to trigger the display of images, control animations, play sounds etc.
There are several rules available to select from:
- Tip Rule --> reacts on the amount of tokens in a tip.
- Room Rule --> reacts on room entry or room leave of a user.
- Counter Rule -->
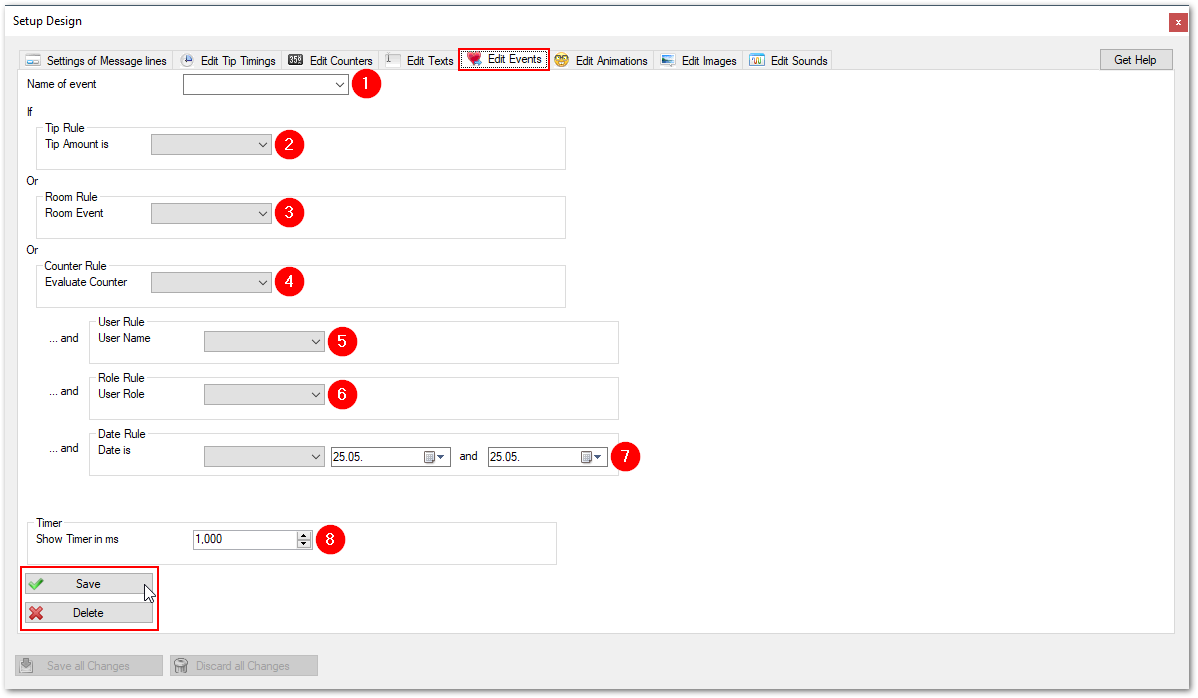
Events are the central point of control. To make it more understandable here the easiest and most common event:
A guest tips you the amount of 15 tokens.
To react on this tip it is necessary to specify an event which reacts on the amount of tokens in a tip.
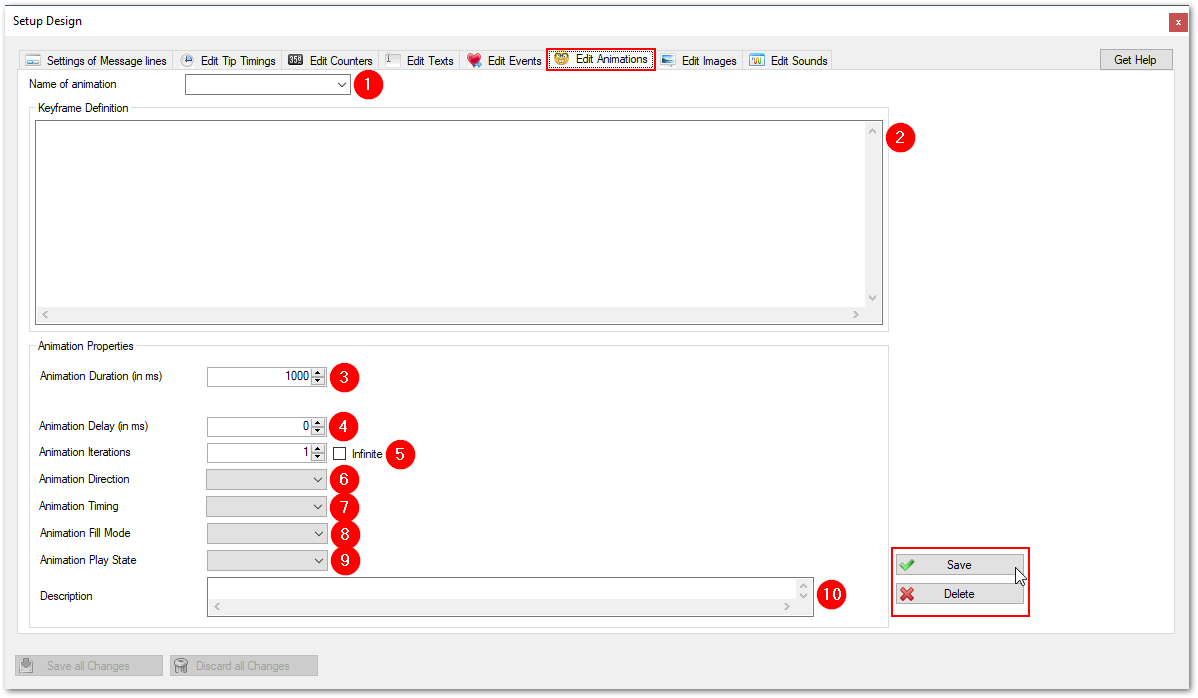
Edit Animations
Overview
In Designer Options you can edit the settings of the animations. This is done by adjusting the settings on the following screen. You find it in TipTicker if you follow this menu path:
Options ==> Design Options ==> select tab "Edit Animations"
The areas of interest are marked with a referencing number in a red dot. All following numberings refer to these dots. Where needed a special chaper describes the setting in detail.
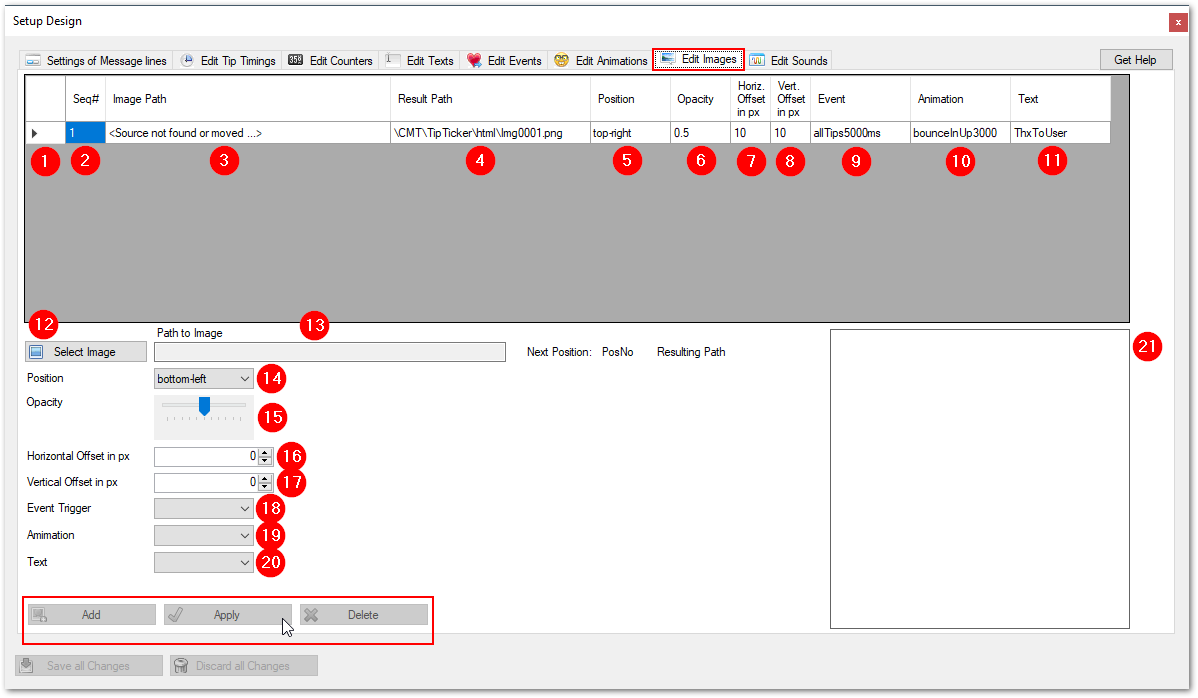
Edit Images
Overview
In Designer Options you can edit the settings of the images. This is done by adjusting the settings on the following screen. You find it in TipTicker if you follow this menu path:
Options ==> Design Options ==> select tab "Edit Images"
The areas of interest are marked with a referencing number in a red dot. All following numberings refer to these dots. Where needed a special chaper describes the setting in detail.
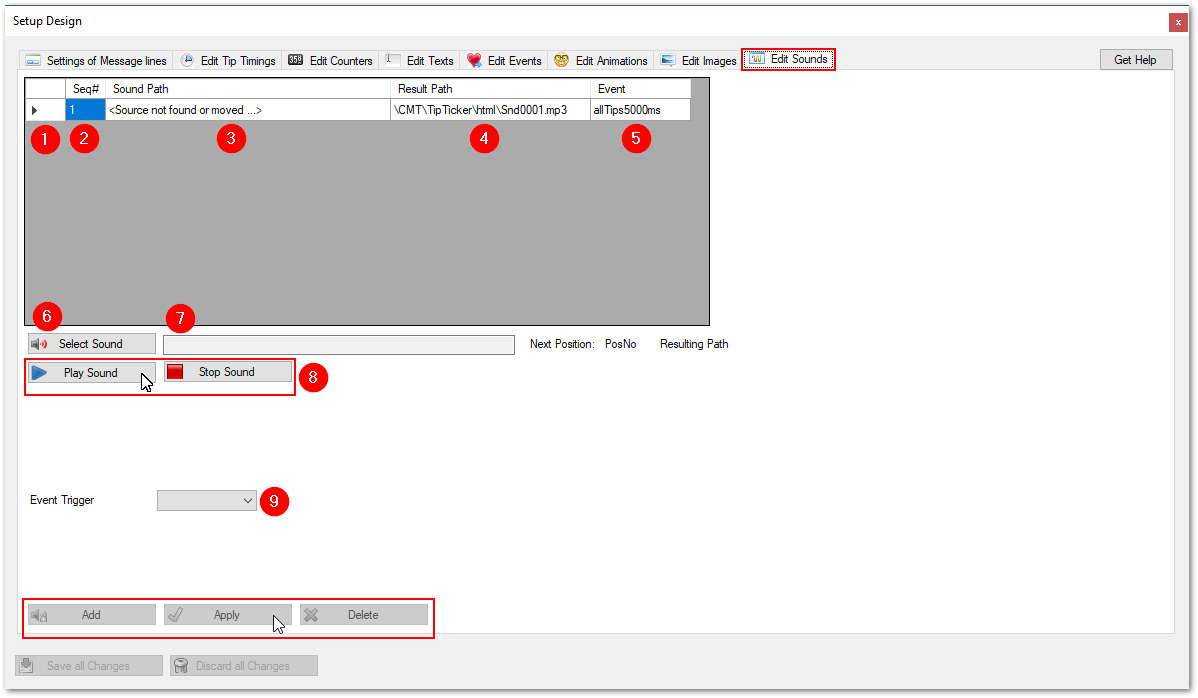
Edit Sounds
Overview
In Designer Options you can edit the settings of the sounds. This is done by adjusting the settings on the following screen. You find it in TipTicker if you follow this menu path:
Options ==> Design Options ==> select tab "Edit Sounds"
The areas of interest are marked with a referencing number in a red dot. All following numberings refer to these dots. Where needed a special chaper describes the setting in detail.