
 Deutsch (Deutschland)
  Español (España)
  Français (France)
  English (United Kingdom)
 Edit Message lines
Overview
In Designer Options you can edit the settings of the tip message lines. This is done by adjusting the settings on the following screen. You find it in TipTicker if you follow this menu path:
Options ==> Design Options ==> select tab "Settings of Message Lines"
The areas of interest are marked with a referencing number in a red dot. All following numberings refer to these dots. Where needed a special chaper describes the setting in detail.
This definition is essential for TipTicker to work. Because of this, TipTicker don't let you connect to your alias if you have not at least made some settings and adjustments here and in Edit Tip Timings.
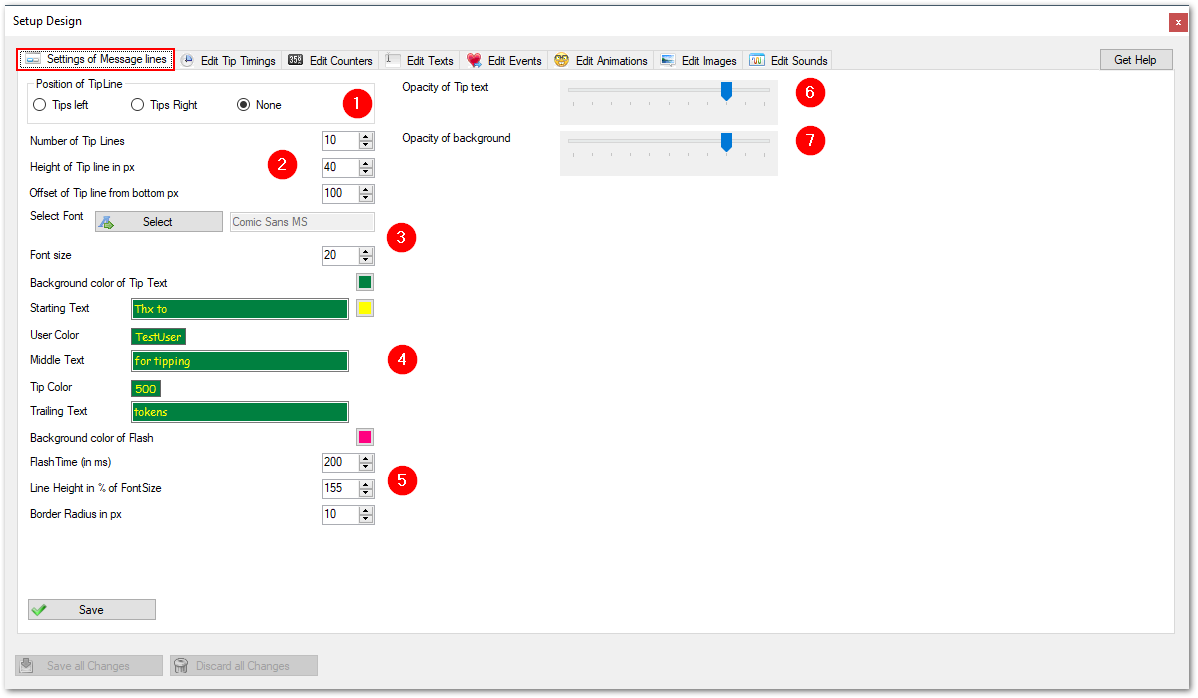
(1) Position of the Tip line:
This setting controls the location of the tip messages. All message lines are located on the bottom of the screen. You can decide if you want them at the left or right side, or no tip messages at all (option none).
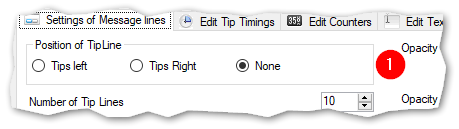
(2) Additional attributes of the Tip line:
- Number of Tip Lines: defines how many tip messages are stacked on display. They get removed one after the other when the defined timeout has reached
- Height of Tip Line: Adjusts the height of the tip messages. You need to set it according to your font size.
- Offset from bottom: sets the distance of the first message from the bottom of the screen. Set it to your needs.
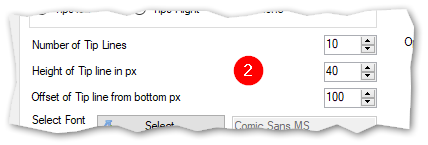
(3) Set Font attributes:
You can use any font which is installed on your broadcasting system. It is even possible to download and install new fonts on your system.
- Select Font: Select the font of your liking. This font will be used to show the messages for incoming tips.
- Font Size: Set the size in pixels of the selected font.
(4) Define the different parts of the tip messages and set the colors.
A tip message consist of 5 parts. 3 of them can be defined individually. All parts will show up together in one message line. You can set the forecolor and the back color of the messages.
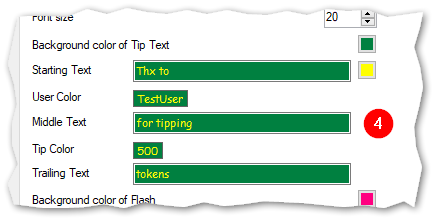
- Background color of the tip text: This defines the color of the message line. Click on it to select a new color.
- Button below (here yellow): defines the color of the message text. Click on it to select a new color.
- Starting Text: Here you define the starting text individually. It preceedes the name of the tipping user.
- Middle Text: Define a text which is placed between the name of the tipping user and the tip amount.
- Trailing Text: Define a text which is following the tip amount.
(5) Define Flash attributes and other attributes:
If you want, every incoming tip flashes once for a short time at the beginning of the appearance. You can also define the gap between two message lines. Finally it is possible to define, that a message line has rounded corners.
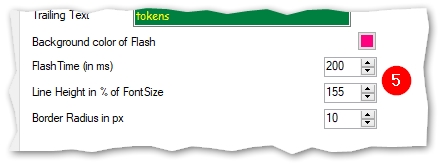
- Backround color of Flash: Define a contrasting color to enable flashing of the beckground of the message line.
- Flash Time: Set the flash time in milliseconds. The higher the value the longer the message is show in the flash color. Be sure to set this value lower than the shortest TipTiming (see next chapter).
- Line Height in % of FontSize: experiment with this to find the correct value. It defines the space betwenn the bottom of the first message line and the bottom of the following one.
- Border Ragius in px: Here you define the rounding of the corners of the message line.
(6) Define the Opacity of the text:
It is possible to set how much of the video stream is covered by the tip message. With this trackbar you can set this attribute. The more left the more transparent the text will be, the more right the more opaque it becomes.
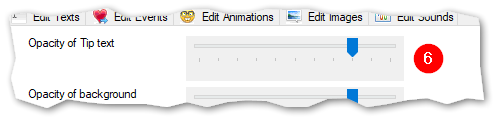
- Opacity of Tip text: Drag the slider to the right and your text will become more opaque. Drag it to the left and it gets more transparent. Set this to your needs.
(7) Define the Opacity of the background:
Same as with the message text can be done with the background of the message line. Adjust it with this trackbar.
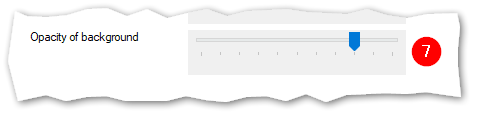
- Opacity of background: Drag the slider to the right and the background will become more opaque. Drag it to the left and it gets more transparent. Set this to your needs.
Dont forget to save your settings!
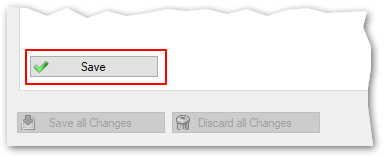
To save the settings you made, click on the Save button. These settings get activated and take effect after you have closed the Design Options screen.